Painting with the Point & Click Tools
You use the Point & Click tool to grow regions of interest based on the standard deviation of intensity values and their connectivity. Threshold values are calculated for all pixels within the area of the selected brush in Add mode. In Remove mode, the threshold value is taken from the central point of the brush.
Point and Click tools

|
|
Icon | Description |
|---|---|---|
|
Point & Click tool |
|
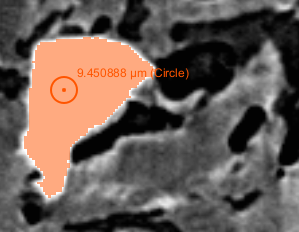
Adds or removes all connected pixels that match the selection criteria, as shown below.
|
|
Point & Click Outline tool |
|
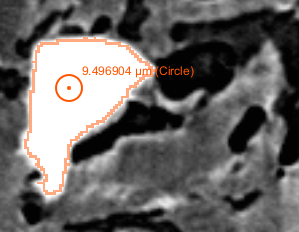
Adds or removes a contour of all connected pixels that match the selection criteria, as shown below.
|
|
Point & Click Fill tool |
|
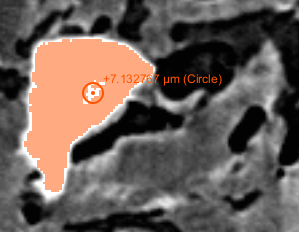
Fills enclosed areas within a region of interest based on the connectivity of unlabeled pixels or voxels (see Filling Holes with the Point & Click Fill Tool).
Note In this case, only the central point of the brush will be considered as the selection. |
|
Dataset drop-down menu |
- |
Lets you choose the dataset that will provide the values for computing the threshold. |
|
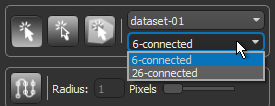
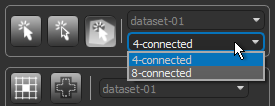
Connectivity drop-down menu |
- |
Lets you choose a level of connectivity, which determines how pixels in 2D images and voxels in 3D images relate to their neighbors. When working in Single-slice mode in 2D views, connectivity is selectable as follows: 4-connected… Propagation is done by strictly using the 4 edges adjacent to the current seed and will result in the minimum number of connected pixels. 8-connected… Propagation is done by strictly using the 4 edges and 4 corners adjacent to the current seed and will result in the maximum number of connected pixels. When working in Multi-slice mode in 2D views and in 3D views, connectivity is selectable as follows: 6-connected… Propagation is done by strictly using the 6 faces adjacent to the current seed and will result in the minimum number of connected voxels. 26-connected… Propagation is done by strictly using the 6 faces, 8 corners, and 12 edges adjacent to the current seed and will result in the maximum number of connected voxels. |
- Select the required 2D or 3D view.
- If you are working on a 2D view, select Single slice or Multi-slice mode, as required (see ROI Painter Tool Settings).
- Select either the Point & Click
 tool or the Point & Click Outline
  tool.
tool. - Select the dataset that will provide the values for calculating the threshold values in the drop-down menu.
- Select the level of connectivity required in the drop-down menu.
- Increase or decrease the brush size, as required.
Note You can use the scroll wheel on your mouse to change the brush size. Brush sizes can also be set in the Brush size box.
- Do the following:
- Hold down Left Ctrl (or your configured Add with key) and then click on a representative region to add selections to the current region of interest or multi-ROI.
- Hold down Left Shift (or your configured Remove with key) and then click on the current region of interest or multi-ROI to remove selections.
Note Refer to Configured Actions for the Point & Click Tools for additional information about the configured actions for the Point & Click tools.
You can correct an automatic or semi-automatic segmentation with the Point & Click Fill tool. In this case, you simply need to select the required connectivity of unlabeled voxels within a region of interest and then click to label connected pixels.
- Select the required 2D or 3D view.
- If you are working on a 2D view, select Single slice or Multi-slice mode, as required (see ROI Painter Tool Settings).
- Select the Point & Click Fill
 tool.
tool. - Select the level of connectivity required in the drop-down menu.
- Do the following:
- Hold down Left Ctrl (or your configured Add with key) and then click on an unlabeled pixel within the current region of interest or multi-ROI.
Note Refer to Configured Actions for the Point & Click Tools for additional information about the configured actions for the Point & Click tools.


